TORNADO & OPERATION DESERT STORM w/1Clk Windows 11 10 8 7 Vista XP Install


Actual Game
Tornado & Operation Desert Storm1-Click Install
|
The Game
Tornado is a simulation of the Panavia Tornado, an aircraft which is in service with several European air forces. The primary mission of the Tornado is tactical strike although the interceptor version is also featured in the game.
Top Gunners should stop right here. Those of you who live for turning and burning or booming and zooming are going to find little to your taste. The standard response to an encounter with an enemy aircraft is to run away as quickly as possible (a dynamic where the Tornado excels). Do not raise your hopes at the prospect of flying the interceptor version since it too handles like a cow and is intended to fire missiles at the greatest possible range before diving for cover. If on the other hand, you fancy a sim where it can take longer to plan the mission than to fly it and you seldom get higher than 200 feet from the ground, then keep reading.
Graphics
All the ground screens are in SVGA and the result is a very sharp and clean presentation for an early 90s sim. For the actual flights the resolution drops to VGA. But do not let that put you off. As I said, in Tornado you will spend most of your time scooting along at 200ft or less and in few simulators will you reap such rich rewards for doing so. The Tornado landscape is liberally covered with towns, factories, bridges, railway lines, power lines and rivers. Each object is quite complicated but they still move at a good clip. The airfields are particularly impressive, coming with selection of runways, taxiways, hardened aircraft shelters and control towers. Other locations like chemical weapon manufacturing plants are almost as good. It almost seems a shame to blow them up. Hills, though obviously made of polygons look good and (most unusually for a flight sim) actually shield you from probing radars. Look at a couple of the in flight screen shots and imagine them whizzing past your cockpit.
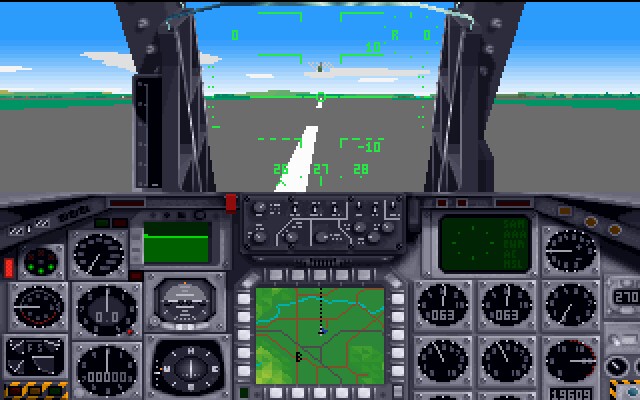
All but a few of the simplest training missions start with you sitting at the end of the runway of your home base. Facing you are more clocks and dials than you would encounter at a watchmaker's convention. Most of these are pretty standard for a flight sim, things such as an altimeter, an air speed indicator and a couple of engine monitoring instruments. Other instruments are more exotic -- for example the E-scope which provides a visual impression of how well the terrain following system is doing or the grandly named secondary control surfaces position indicator. The Tornado is a swing wing aircraft but unlike the F-14 for example, all wing positioning is done manually. Absentmindedly swinging the wings forward when the aircraft is travelling at high speed can lead to catastrophic structural failure. Even if the old crate holds together, the wings will be stuck in the fully swept position leaving you with what can only be described as an interesting landing problem. Combat damage can also cause the failure of the wing folding mechanism.
Above these is your view on the outside world which depending on circumstances may be pitch blackness, a grey sky or a beautiful sunlit day. Wind the engine up, kick in the afterburner and one of Tornado's nice features appears, the whole screen starts shaking as if from the suppressed thrust behind you. Release the wheel brakes and the aircraft gallops off down the runway. Precisely how fast you gallop depends on how heavily your aircraft is loaded.
Once airborne, you can begin to look around. It is now that you realize that whatever it might be, the Tornado is not a fighter. Not only is there no padlock view, there isn't even a view to the rear so that you cannot check your six! The usual external views are provided though. The Tornado is a two seater and you can move to the back seat with the press of a key. Here you have no view to the outside world at all, just a bunch of screens staring at you. You will spend rather a lot of time staring at these as the mission progresses. There are some instruments common to both seats, a compass, an artificial horizon, the undercarriage indicator, an airspeed indicator and an altimeter. One other item featured in both cockpits is the multi-function display, a very useful piece of kit. On this you can monitor the autopilot's functions, display a map of your surroundings, display a backup ILS indicator, show the radar display in both air and ground modes or show a forward view from a camera mounted in front of the aircraft. At night, this display will be an Infra Red version, useful for spotting those tall buildings looming up which you missed during the flight planning. In radar mode, you can interact with this display using the mouse.
The rear cockpit also features two large TV display which can be used for a variety of functions including a topological map showing your position relative to the planned flightpath, a larger view through the forward looking camera, a scrollable map of the area which allows you to set up temporary waypoints and the sighting system for the laser target designator Between the two large displays and under the MFD is the armament panel where you can arm weapons and select their delivery mode. One nice touch is that if you can remember the key strokes, you can also select and configure weapons from the front cockpit though in this case, you get no visual feedback. To the right of the weapons panel is the warning panel which reports any damage which your Tornado may have suffered.
Before taking off, you will typically have spent some time devising your flight plan in the mission planner. On takeoff, this flight plan is stored in your navigation computer. The Tornado's autopilot is a comprehensive one which can practically fly the whole mission for you but what would be the fun in that? At its simplest, the autopilot will simply hold the heading and altitude which the aircraft had when the autopilot was engaged. The heading and altitude settings of the autopilot can be changed by moving the control stick as normal.
Should you decide to liven things up a bit, you can engage terrain following mode. Instead of holding the aircraft at a fixed altitude, the autopilot will now attempt to fly at a given height above the landscape, rising over hill and diving into valleys. The terrain follower is very good but it does have its limits. Anyone attempting to hug the earth at 200 ft while travelling at 700 MPH is very soon going to encounter the failure mode of the terrain follower, a sharp pull up accompanied by much flashing of warning lights and blaring of klaxons. Needless to say, this is the very last thing that you want to happen to you when you are trying to sneak through a valley passed the massed defenses of the baddies. One other minor drawback of terrain following is that the minimum altitude it can be set to is 200 ft. and this isn't really quite low enough when things get really hairy. In this situation, all you can do is grab the stick and fly the beast yourself keeping one eye on the E-scope, one eye on the radar altimeter and one eye on the RWR. The quicker minded readers will spot an obvious flaw in this procedure.
Normally, most of the mission will be flown with the autopilot in track mode. In this mode the autopilot follows the flight plan (which includes the altitude at which each leg should be flown). All the pilot needs to do is set the appropriate speeds for each leg and to arm and release the weapons at the appropriate moment. Should you set up a temporary waypoint, the autopilot will also fly you to it. This is useful for setting up new approaches if a target has been missed or a landing mucked up.
There are two other features of the autopilot which should be mentioned. One is approach mode whereby if engaged within the ILS cone of a friendly airfield, the autopilot will fly the approach all the way to the threshold of the runway. When using the autopilot to follow the flight plan, approach mode will be engaged as soon as the aircraft reaches the last waypoint of the flight plan (which must lie within the ILS cone of an airfield) and so in theory it is only necessary to manually fly the Tornado for the first and last few seconds of the flight. It is all too easy to come to depend on this feature, then discover it is not available due to battle damage just when you have a particularly tricky landing to make. One last feature of the autopilot is the autothrottle. Dial in an airspeed and the autothrottle will do its best to keep the aircraft at that speed. Since in some missions, timing is vital, the autothrottle saves a lot of jiggling about with the engines to get to the waypoint at exactly the right time.
Let's look at the various methods of bomb delivery. Manual mode, as you might expect, leaves all the work to you. A continually calculated impact point is displayed on the HUD and it's up to you when to release the bomb load. This method is really only used for attacks on moving targets or when the autopilot is out of action.
In laydown mode, the autopilot flies the aircraft towards the attack waypoint as set up in the flight plan. Holding down the release key or squeezing the trigger authorizes the autopilot to release the weapon. The auto pilot decides when the weapon will actually be released. You might think that a delivery mode restricted to targets established before the start of the flight isn't very useful but laydown mode can also be used for attacking targets of opportunity. A temporary waypoint can be designated on one of the moving map or ground radar displays and the autopilot can then fly a laydown attack on this temporary waypoint.
Loft mode is the Tornado's method of carrying out attacks on a target while remaining clear of it. Instead of dropping the bomb just before overflying the target, a flight profile is flown such that the bomb on release is lobbed onto the target from a distance allowing the attacking aircraft to escape. The advantage here is that the aircraft does not have to fly over the heavily defended targets. The tradeoff is accuracy. Approaching the target in loft mode, a visual indication is given of the distance to the pull up point. When this is reached another countdown indicator starts and the pilot must assume manual control of the aircraft and fly so as to place the aiming marker in the middle of the HUD. When the second countdown completes, the weapons will be released (always assuming the trigger is being squeezed at the time) and the aircraft is free to turn away. It is vital that the aiming point is centred in the HUD as quickly as possible since any course variations late in the run will affect accuracy.
Laser bombs can be guided onto target using the TIALD (thermal imaging and laser designating) system. The output from this system can be shown on one of the displays in the rear cockpit. What you get is a view through a camera mounted underneath the Tornado. This camera can be positioned using the mouse and the view can also be zoomed in or out. At night, this view will be an infrared one (everything is a shade of green). By left clicking, a spot can be chosen for the laser to be aimed at. This point can be refined by holding down the left button and dragging the point.
Using the TIALD presents several problems. To give yourself enough time to find and designate your target, you need to fly high (above 20,000 ft) and slow (300-350 kts). This makes you a sitting duck for every SAM in the neighborhood. Secondly, bombs dropped from 20,000 ft take over 30 seconds to reach the ground so you must plan ahead. The laser bomb training mission required that you hit four hardened aircraft shelters, one bomb per shelter. If you designate the first shelter, release the first bomb and wait for it to hit the target before releasing the second bomb, the targets will be out of the TIALD's limited field of view long before the second bomb hits. What you must do is, as the target approaches release the required number of bombs leaving enough time to adjust your aim between each bomb arriving. A good interval between releases is about eight seconds. While releasing the bombs, you should also try to designate the first target, using the zoom function to refine your aim. When the first bomb hits, you have eight seconds to point the designator at the second target before the second bomb arrives, and so on. You'll be so busy, you'll probably even forget about the hoards of SAMs heading your way. Another minor problem with laser guided bombing is that if there's a cloud between you and the target it doesn't work.
The ALARM anti-radiation missile can be used in two modes. In direct mode, the missile will home into whatever radar source happens to be most directly in front of the aircraft. In indirect mode, the missile when fired will head for the currently selected waypoint and will zoom to 10,000 ft. It will then deploy a parachute and hang above the waypoint searching for radar sources. When it detects one, it releases the parachute and heads for the target. The is a very good way of dealing with radars which you know must be around but which haven't switched on yet.
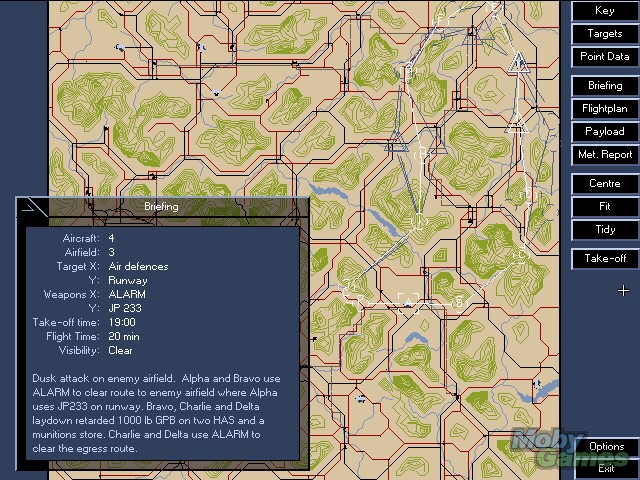
The mission planner presents you with a map of your warzone; this includes three European zones and the Desert Storm add-on scenario. You can zoom into this map and move it about by using the right button of the mouse. This map shows contours, roads, railways rivers and powerlines, airfields and structures. On the right hand side is a column of buttons. By clicking on these, you can bring up a key to the map which allows you to control what is shown on it. Useful stuff such as the disposition of enemy AA and the coverage of early warning radar can be displayed at the click of a button. Data such as the height, the EWR ceiling, and the presence of any structures or craters for any point on the map can be obtained. You can use the target locator to highlight all occurrences of a particular building type on the map. And when you have chosen your target, you can create your flight plan.
A flight plan consists of up to 15 waypoints. A waypoint can either be a turning point, an initial point for an attack (i.e. where your bombing run begins), the target itself or an approach point (where you should be able to pick up the ILS beam of your home runway). There are several attributes associated with a waypoint such as time at waypoint, the altitude and speed at which the leg to that waypoint should be flown and, if the waypoint is a target waypoint, which weapons which should be dropped there. By and large, the only occasion where time at a waypoint becomes important is when planning a multi-plane attack. You want all the aircraft to arrive at the target soon enough to take advantage of any defense suppression which may have taken place but on the other hand, you don't want aircraft getting caught in the blast from another aircraft's weapons. The mission planner will jiggle speeds and times to get you to the waypoint in time. It will also alert you of any problems with the mission such as allowing insufficient time to travel between waypoints. The turning circle of the aircraft at various speeds is also allowed for and you will be warned if you are attempting too tight a turn. Weaponry selected in a target waypoint will be automatically loaded onto the aircraft and you can also take the time to load up with those little extras which make all the difference to a pleasant flight.
Once you have your flight plan assembled, you can view a profile of your intended course. This will show you the terrain, your intended height above the terrain, any threats and EWR coverage for part or all of your flight plan. This is useful for spotting those little AA nests you may have overlooked. You can check on the weather (visibility, windspeed and direction) or get a summary of the flight (where you're starting from, where you're going and how much fuel you need to get there). Finally you can click on 'take off' and find out just how inspired your planning has been.
As you can see, planning the flight of a single aircraft is no minor undertaking. Imagine the work needed to plan the flights of up to six aircraft which may be attacking several different targets. This challenge can be yours if you take part in a Tornado campaign.
Campaigns
Once you have got the hang of flying single missions, you can try your hand at masterminding a complete campaign in any of the four warzones. When taking part in a campaign, at the start of each mission,you are given a task to accomplish (destroying a certain building etc.) and have complete freedom to devise a flight plan which will accomplish this with minimal casualties. Success or failure in the mission will have a direct effect on the ongoing conflict. You will discover that merely completing the assigned task each time will not be enough to bring victory to your side. You have to keep a lookout for additional targets close to your proposed flight plan and take those out as well. The sim features two campaign levels. In a level one campaign, you are only concerned with planning your own flight. In a level two campaign, you plan for up to six aircraft. When take off time comes, you will always fly the lead aircraft of the strike though as there is no communication between aircraft during the mission, the role of the lead aircraft is no different from any other. Here I can offer one piece of advice based on bitter experience. When returning from a multiplane strike, take care not to stop in the middle of the runway after landing since if you do so, you will be rammed astern by one of your returning colleagues with disastrous results. When you have proved your worth by winning a level two campaign, you can try your hand at command. Here you have total freedom to run the war as you please. You choose the targets, decide how many aircraft will be assigned to each target and then plan the mission. Running a command campaign can take a very long time. Operation Desert Storm
As its title suggests, Desert Storm extends the original Tornado game with a new warzone loosely based around the Gulf war. The add-on warzone is not, however, just a new map and set of missions. Landscape and 3D object graphics have been entirely reworked for the new scenario. The new warzone approximates the geography of the region and is, of course, rendered in desert browns and yellows rather than the original warzone's 'European' greens. Similarly, the frequents towns, factories and powerlines of the original scenarios have been replaced by open desert broken up by oil-fields, sand-dunes, bedouin encampments and similar paraphernalia. Although the limitations of the Tornado graphics engine with respect to topography (narrow, steep, valleys are impossible) and map size (roughly 200 miles square) are noticeable, there are compensating strengths. The map is 'dense' with many detailed 3D objects that are convincingly Arabian in appearance. There are also plenty of minor objects, and gentle undulations in the scenery so that landscape feels alive and altitude is easily judged. The various vehicles and aircraft appearing in the game have also been thoroughly updated for the new scenario. Colour schemes have been adjusted for desert camouflage, and types not present in the Gulf have been replaced by those that were. For example, the advanced Mig-31 and Su-27, which the Iraqi's did not own, have been replaced by the older Mig-25 and Mirage F-1 (with flight models to match). Personally, I found it rather pleasant change to be able to come to grips with enemy interceptors in air to air missions that did not have a big maneuvering advantage over the Tornado ADV (Air Defence Variant)! Desert Storm also updates the wargaming engine that works out the course of campaigns in Tornado. In the original Tornado the wargaming engine almost always results in campaigns that resemble wars of attrition with the opposing sides slugging things out with relatively little movement. In Desert Storm, however, anti-air strikes have been given more weight and conflicts between opposing ground forces made faster so that campaigns become more mobile - more like wars of maneuver such as Desert Storm itself. The 20 pre-programmed missions in the add-on are designed to approximate the course of the actual Gulf war, with the manual providing much entertaining and informative background material on both the simulation and the real Gulf war. The warzone map (although hardly geographically accurate) contains numerous features drawn from the actual conflict. For example, the range of hills south of the main allied airbases contains a long narrow valley. This is, presumably, intended as representation of the `Star Wars Trench Valley' beloved of allied pilots as they honed their skills prior to going on the offensive. The Iraqi defensive line is also modeled: the map includes an extensive east-west line of trenches and bunkers whose floors actually seem to extend below ground level! The Desert Storm add-on greatly extends the playability of the base game and will keep you busy for a quite awhile. Conclusion
You might have guessed I am a serious Tornado fan. I don't know of another sim of mid 90s vintage which provides a richer flying experience while maintaining a combination of edge of the seat flying and desperate system management. The tension is intensified as you struggle to get the right weapons package armed before you reach the target while trying to fly below 100 ft and drop enough chaff to put off that fighter behind you! When you include the superb mission planner and the campaigns, you are left with a very impressive package indeed. If you can manage to raise an interest in the job of bombing ground targets rather than shooting down bogies and if you are prepared to invest a good deal of time into coming to grips with it, then Tornado is well worth the time investment.